If you've managed macOS devices with Microsoft Intune for any length of time, you've probably run into this scenario: a user completes ADE enrollment, hits the desktop, and immediately starts poking around before their required apps have finished installing. Defender isn't running yet. Company Portal is halfway through. Teams hasn't even started. And now you've got a support ticket.
Windows has a built-in Enrollment Status Page that blocks the desktop until device setup is complete. macOS doesn't. And this was also something that came up when I was having a session at Experts Live in Denmark last month. So I started to build something that's easy to set up.
The Problem With Existing Approaches
Most ESP-style solutions for macOS rely on the same pattern: a script deployed per-app via Intune that fires a SwiftDialog update when that specific app finishes installing, or drop information in a specific folder which need to be specified. It works, but it has some drawbacks.
You need a separate script for every tracked app. Install order is non-deterministic in Intune, so you need to handle race conditions. Native MDM apps — Microsoft 365, Defender, Edge — don't go through the Intune Management Extension at all, so they never trigger IME-based scripts. And maintaining the whole thing as your app catalogue grows becomes a headache.
I wanted something different: deploy one PKG, configure a list of apps, done. No per-app scripts. No race conditions. No maintenance overhead per app.
How It Works
The framework is built around two components that communicate through a shared JSON state file.
The LaunchDaemon runs as root from the moment the device enrolls. It polls for each tracked app every 10 seconds using mdfind — Spotlight's bundle ID index — which works for every install type including native MDM apps that never touch IntuneMDMDaemon.log. When all required apps are detected, it updates the state file and signals the UI to enable the Continue button.
The LaunchAgent runs in the user's session. It waits for the daemon to signal ready, launches SwiftDialog with a live-updating app list, and polls the state file every 3 seconds to pipe updates through SwiftDialog's command file interface. When the user clicks Continue, it archives the logs and tears everything down cleanly.
The key insight that makes this work — and that took some real digging to validate — is that native MDM-deployed apps like Microsoft 365, Defender, and Edge never appear in IntuneMDMDaemon.log. They go through mdmclient instead. Any solution that only watches the IME log will silently miss them. mdfind doesn't care how an app was installed. It just checks whether it's there.
Is daemons and agents overkill? Perhaps, but I like to think about the future where we can deploy agents and daemons during ESP, set install order of applications and Intune have an equivalent of PreStaging? What a dream... Therefore I think this is a way to go.
The Detection Strategy
Each tracked app gets three detection attempts in order:
- Spotlight (
mdfind kMDItemCFBundleIdentifier == 'com.microsoft.Word') — the primary method, works for all install types - Path check (
-e /Applications/Microsoft Word.app) — fallback if the Spotlight index hasn't caught up yet during early enrollment - PKG receipt (
pkgutil --pkg-info) — second fallback, same method Intune uses internally
This three-layer approach means apps get detected correctly whether they came in through the native MDM stack, the Intune Management Extension, or were already present on the device.
Let's configure!
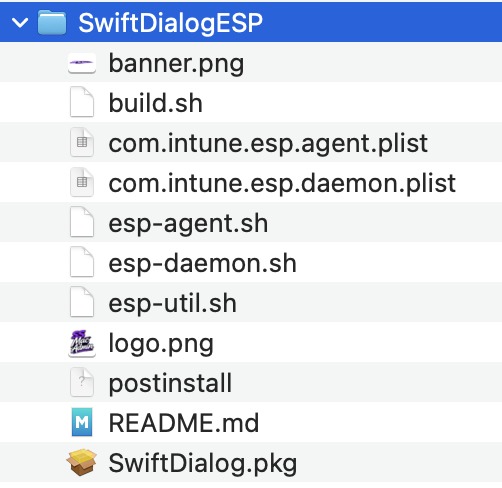
Start by dropping by the GitHub and download the zip file. When unwrapped it should look like this:
ESP-SwiftDialog/
├── build.sh
├── esp-daemon.sh
├── esp-agent.sh
├── esp-util.sh
├── com.intune.esp.daemon.plist
├── com.intune.esp.agent.plist
├── postinstall
├── SwiftDialog.pkg      ← you provide this
├── logo.png             ← optional
└── banner.png           ← optional
We only need to touch two files - the esp-daemon.sh and esp-agent.sh.
Setting apps to track, Required vs Optional Apps
Let's set up what applications we want to track in our ESP, open up esp-daemon.sh and look at lines starting from 62. It should look like this: 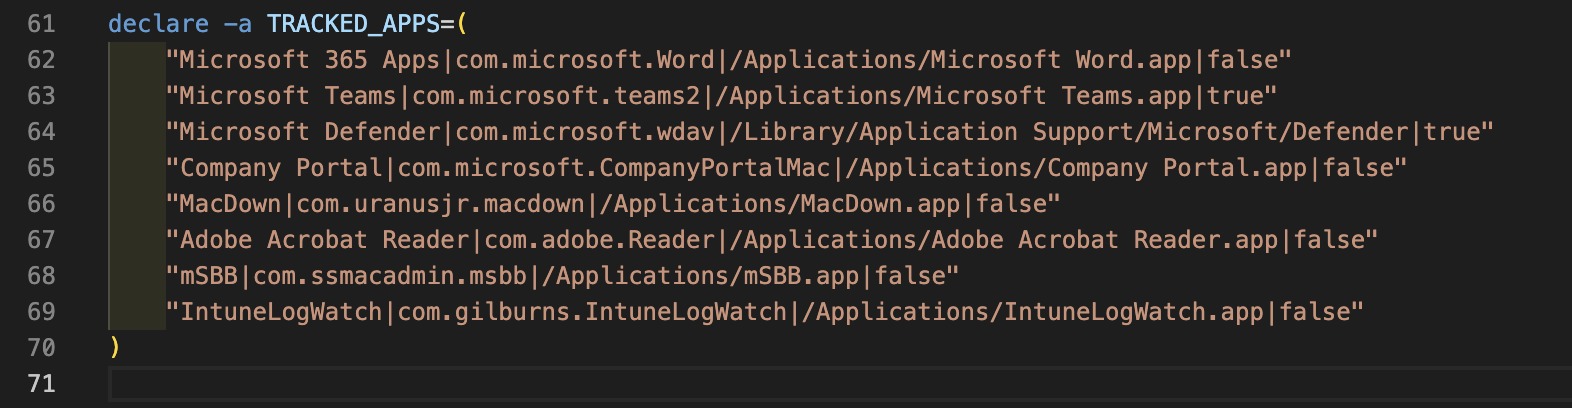
Not every app should block the user from getting to their desktop. The framework supports a required flag per app:
declare -a TRACKED_APPS=(
    "Microsoft 365 Apps|com.microsoft.Word|/Applications/Microsoft Word.app|true"
    "Microsoft Teams|com.microsoft.teams2|/Applications/Microsoft Teams.app|true"
    "Slack|com.tinyspeck.slackmacgap|/Applications/Slack.app|false"
)
Required apps (true) hold the Continue button until installed. Optional apps (false) show up in the list with their real-time status but don't block the user. The daemon only enables the button when all required apps are confirmed present.
When you've set up the applications you want to track, there's nothing else to configure here - we can head over to the cosmetics how it will visually look.
Branding and Customisation
Everything visual is configured in a single block at the top of esp-agent.sh, starting at line 33:
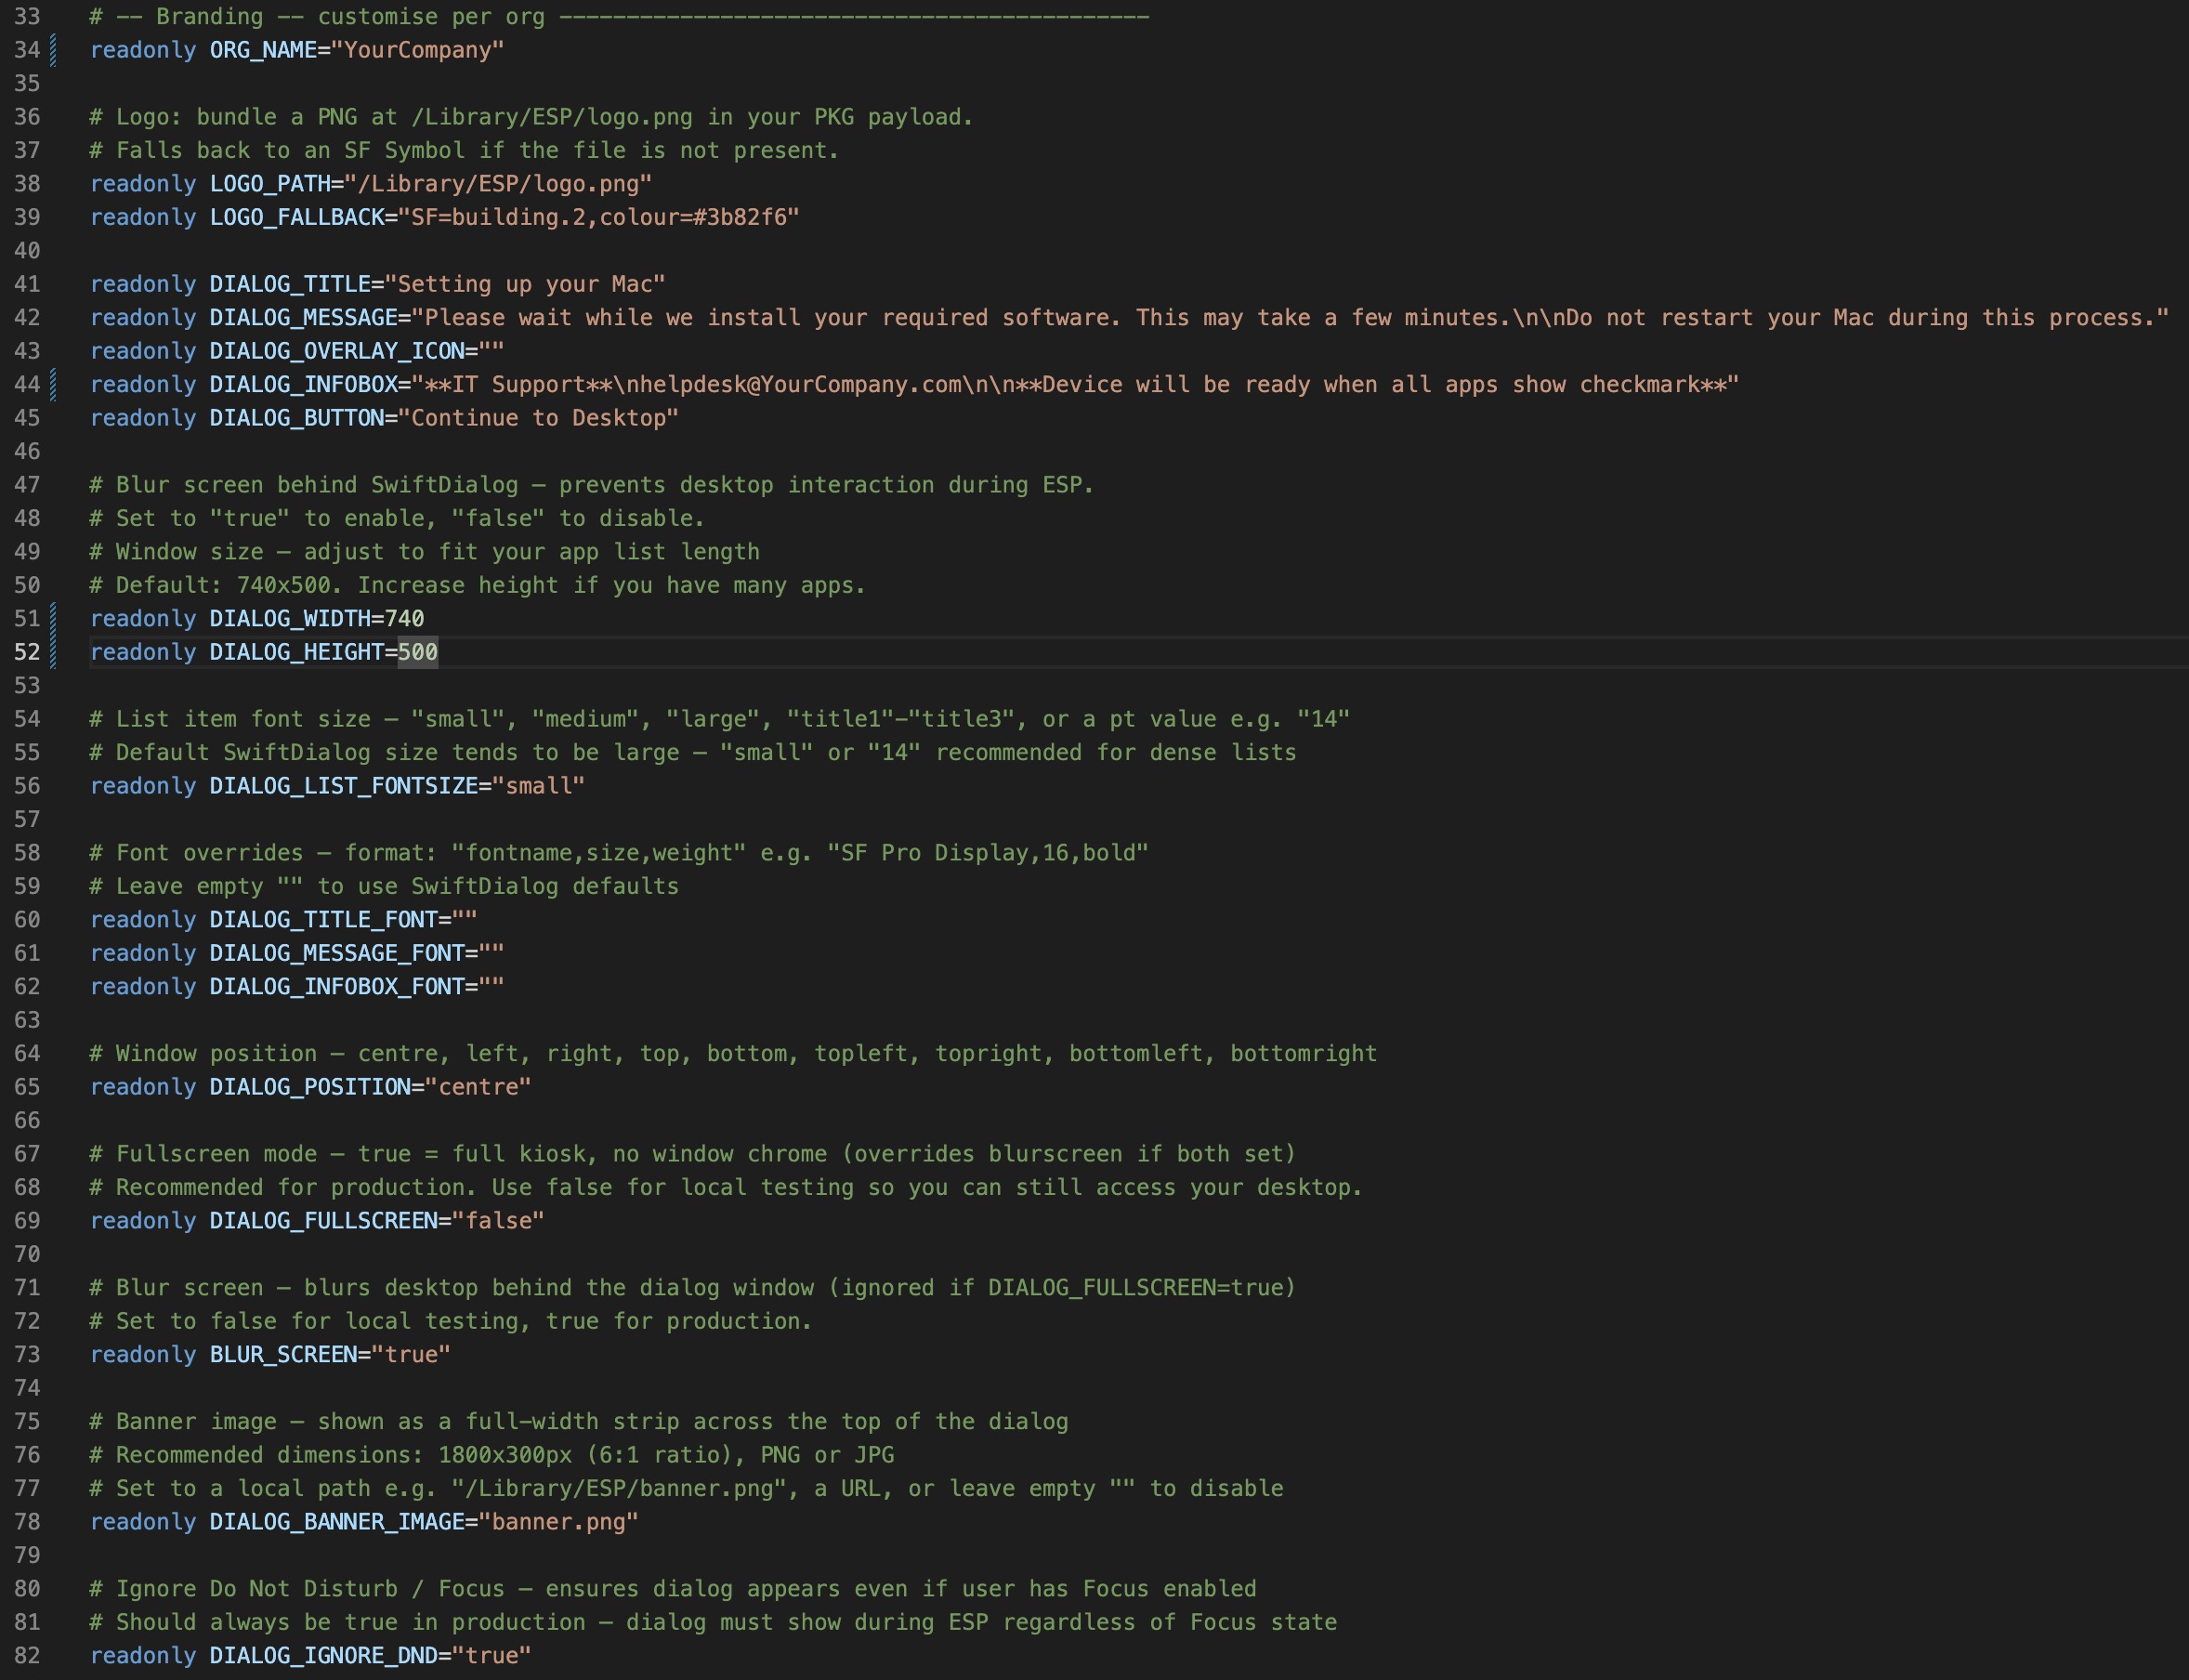
readonly ORG_NAME="Contoso"
readonly LOGO_PATH="/Library/ESP/logo.png"
readonly LOGO_FALLBACK="SF=building.2,colour=#3b82f6"
readonly DIALOG_BANNER_IMAGE="/Library/ESP/banner.png"
readonly DIALOG_TITLE="Setting up your Mac"
readonly DIALOG_POSITION="centre"
readonly DIALOG_FULLSCREEN="false"
readonly BLUR_SCREEN="true"
readonly DIALOG_IGNORE_DND="true"
readonly DIALOG_LIST_FONTSIZE="small"
readonly DIALOG_WIDTH=740
readonly DIALOG_HEIGHT=500
Drop your logo (512×512px PNG) and banner (1800×300px, 6:1 ratio) in the repo root before building and they get bundled automatically. No need to add an actual path in the settings for them, just drop them in the folder and be happy. Don't forget to name them banner.png or logo.png.
Set DIALOG_FULLSCREEN="true" for a hard kiosk experience where the user can't interact with anything else, or BLUR_SCREEN="true" for a softer version that blurs the desktop behind the dialog.
One setting worth calling out: DIALOG_IGNORE_DND="true" should always be on in production. If a user has Focus mode active at first login, SwiftDialog won't appear without it.
When you have set the configuration you like and added your logo and/or banner and the structure look like the image below, it's time to build!
When testing locally on your device when configuring the cosmetics I advice not to use the Blur or Fullscreen experience as it might be quite hard to exit out of.
Lets build - What Gets Deployed
Everything ships in a single PKG built with macOS's built-in pkgbuild — no third party tools required.
Start up your terminal and trail to the folder where all the files are located. Type ./Build.sh to initiate the PKG-building. It will give you a complete log of what was build.
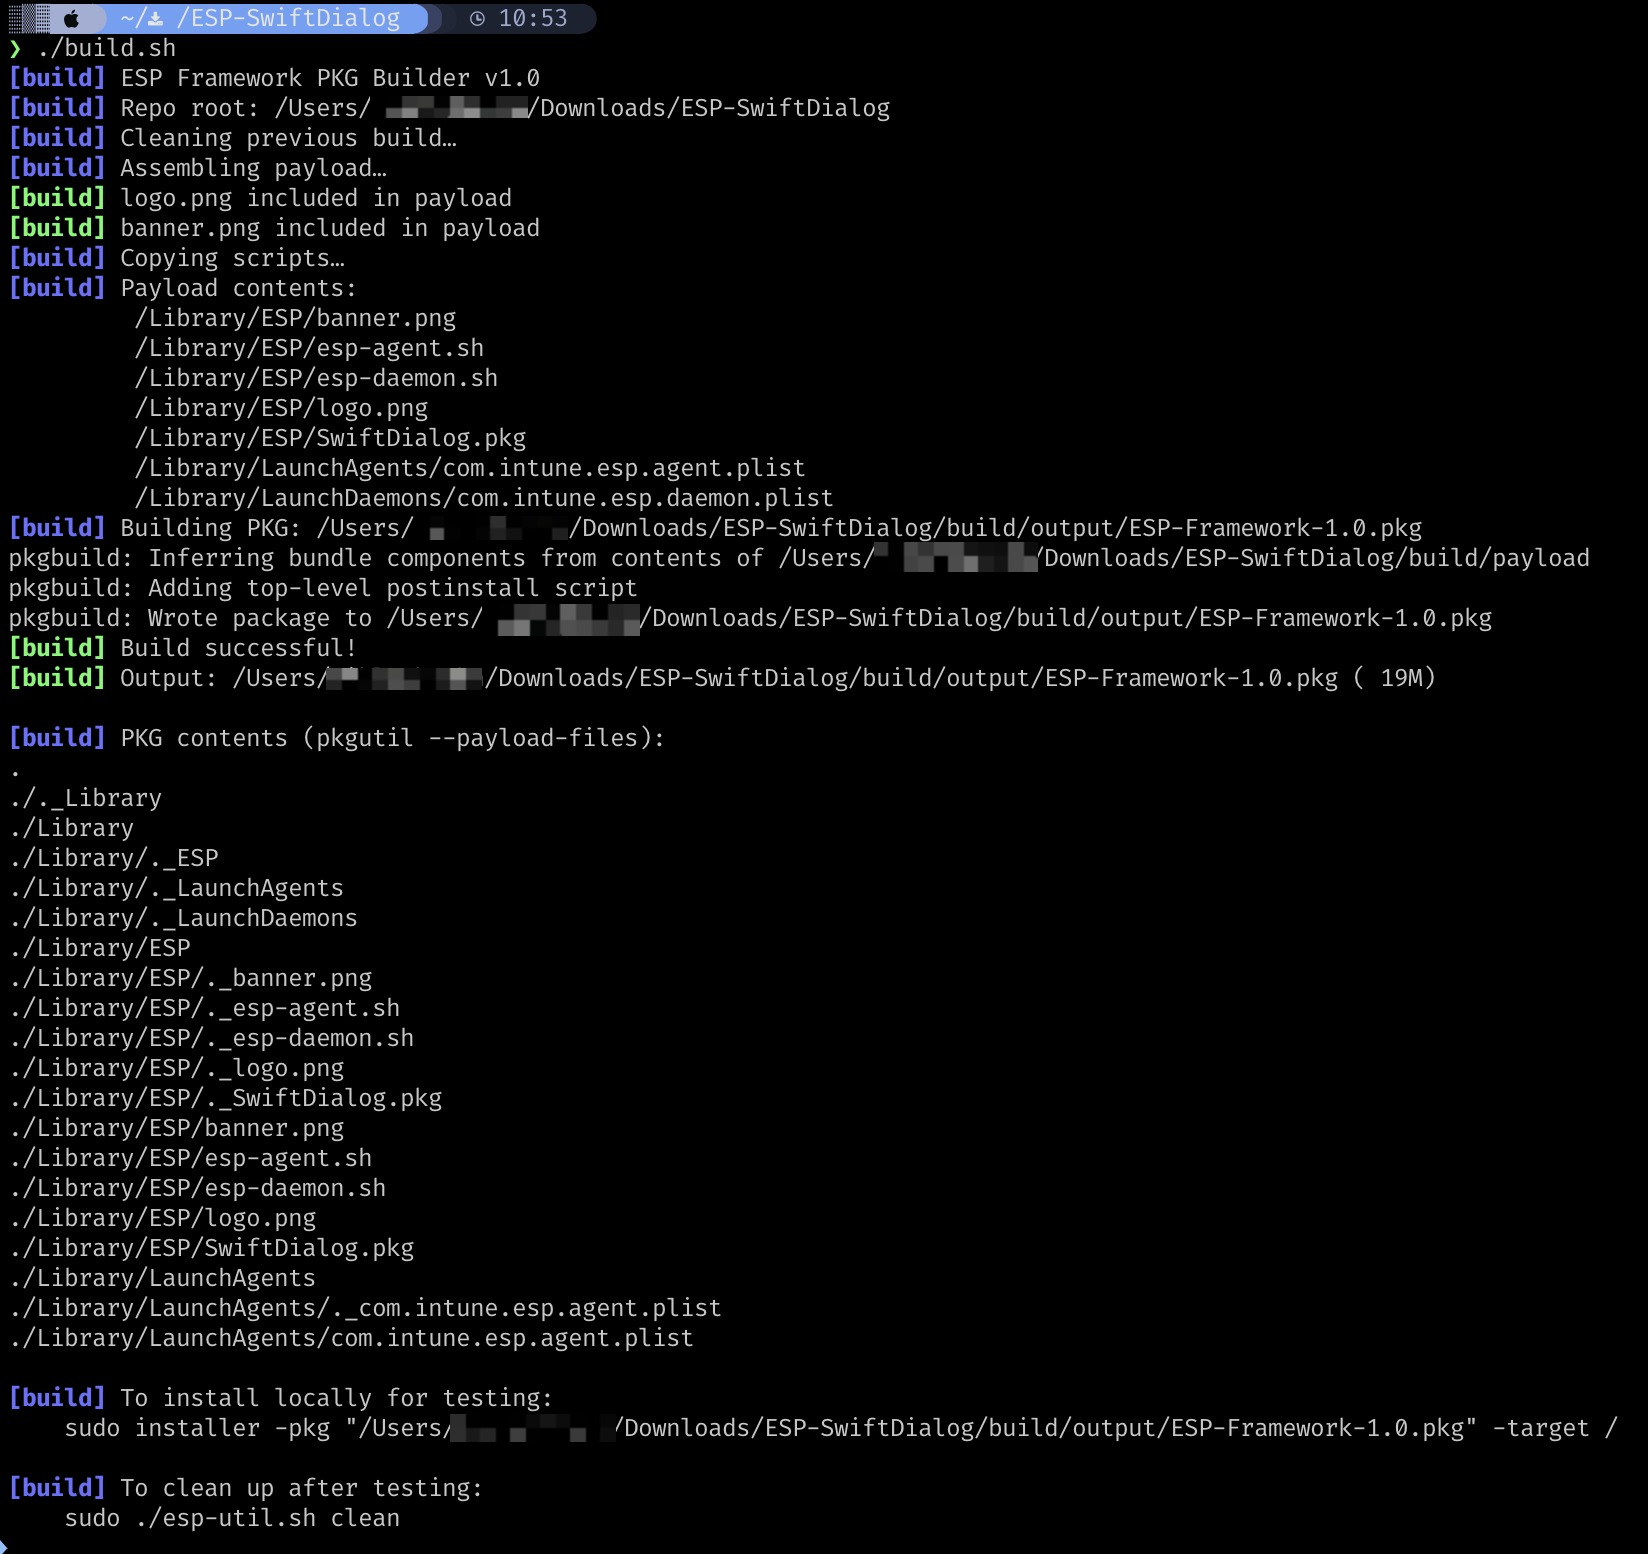
You should now have a folder named "build" in your project. 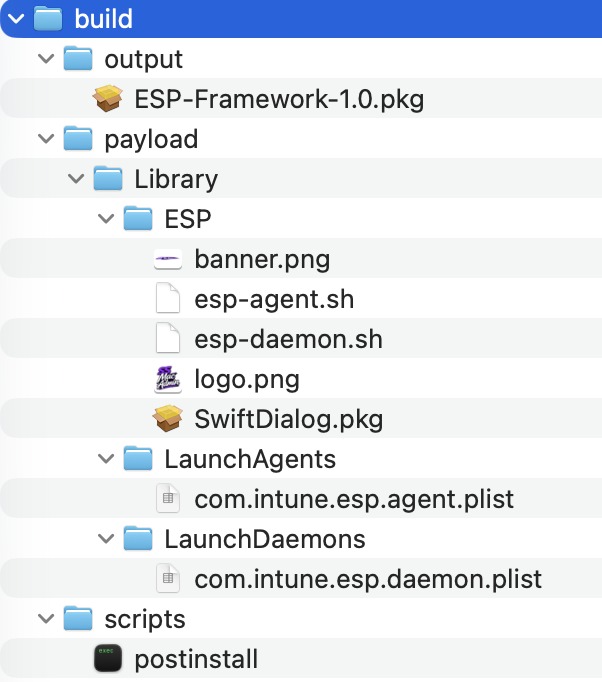
The payload contains:
esp-daemon.sh— the root-level monitoresp-agent.sh— the user-level UI controllerSwiftDialog.pkg— bundled and installed by the postinstall scriptlogo.png/banner.png— optional org branding, auto-detected by the build script
The postinstall script installs SwiftDialog first, sets directory permissions correctly so the user-context agent can write logs, creates the log archive directory, and bootstraps the LaunchDaemon. The LaunchAgent loads automatically at first login — which on a real ADE enrollment is exactly when you want it.
Now let's head to Intune to deploy!
Intune Deployment
Stat out by going to Apps -> macOS -> Create -> macOS App (PKG) and click Select. This allow us to deploy applications that's not signed.
Click on "Select app package file and upload the ESP-Framework-1.0.pkg we created in our last step with out build script. Click OK and Next to proceed.
Select the name you would like to have, this is only for cosmetics in Intune for your eyes.
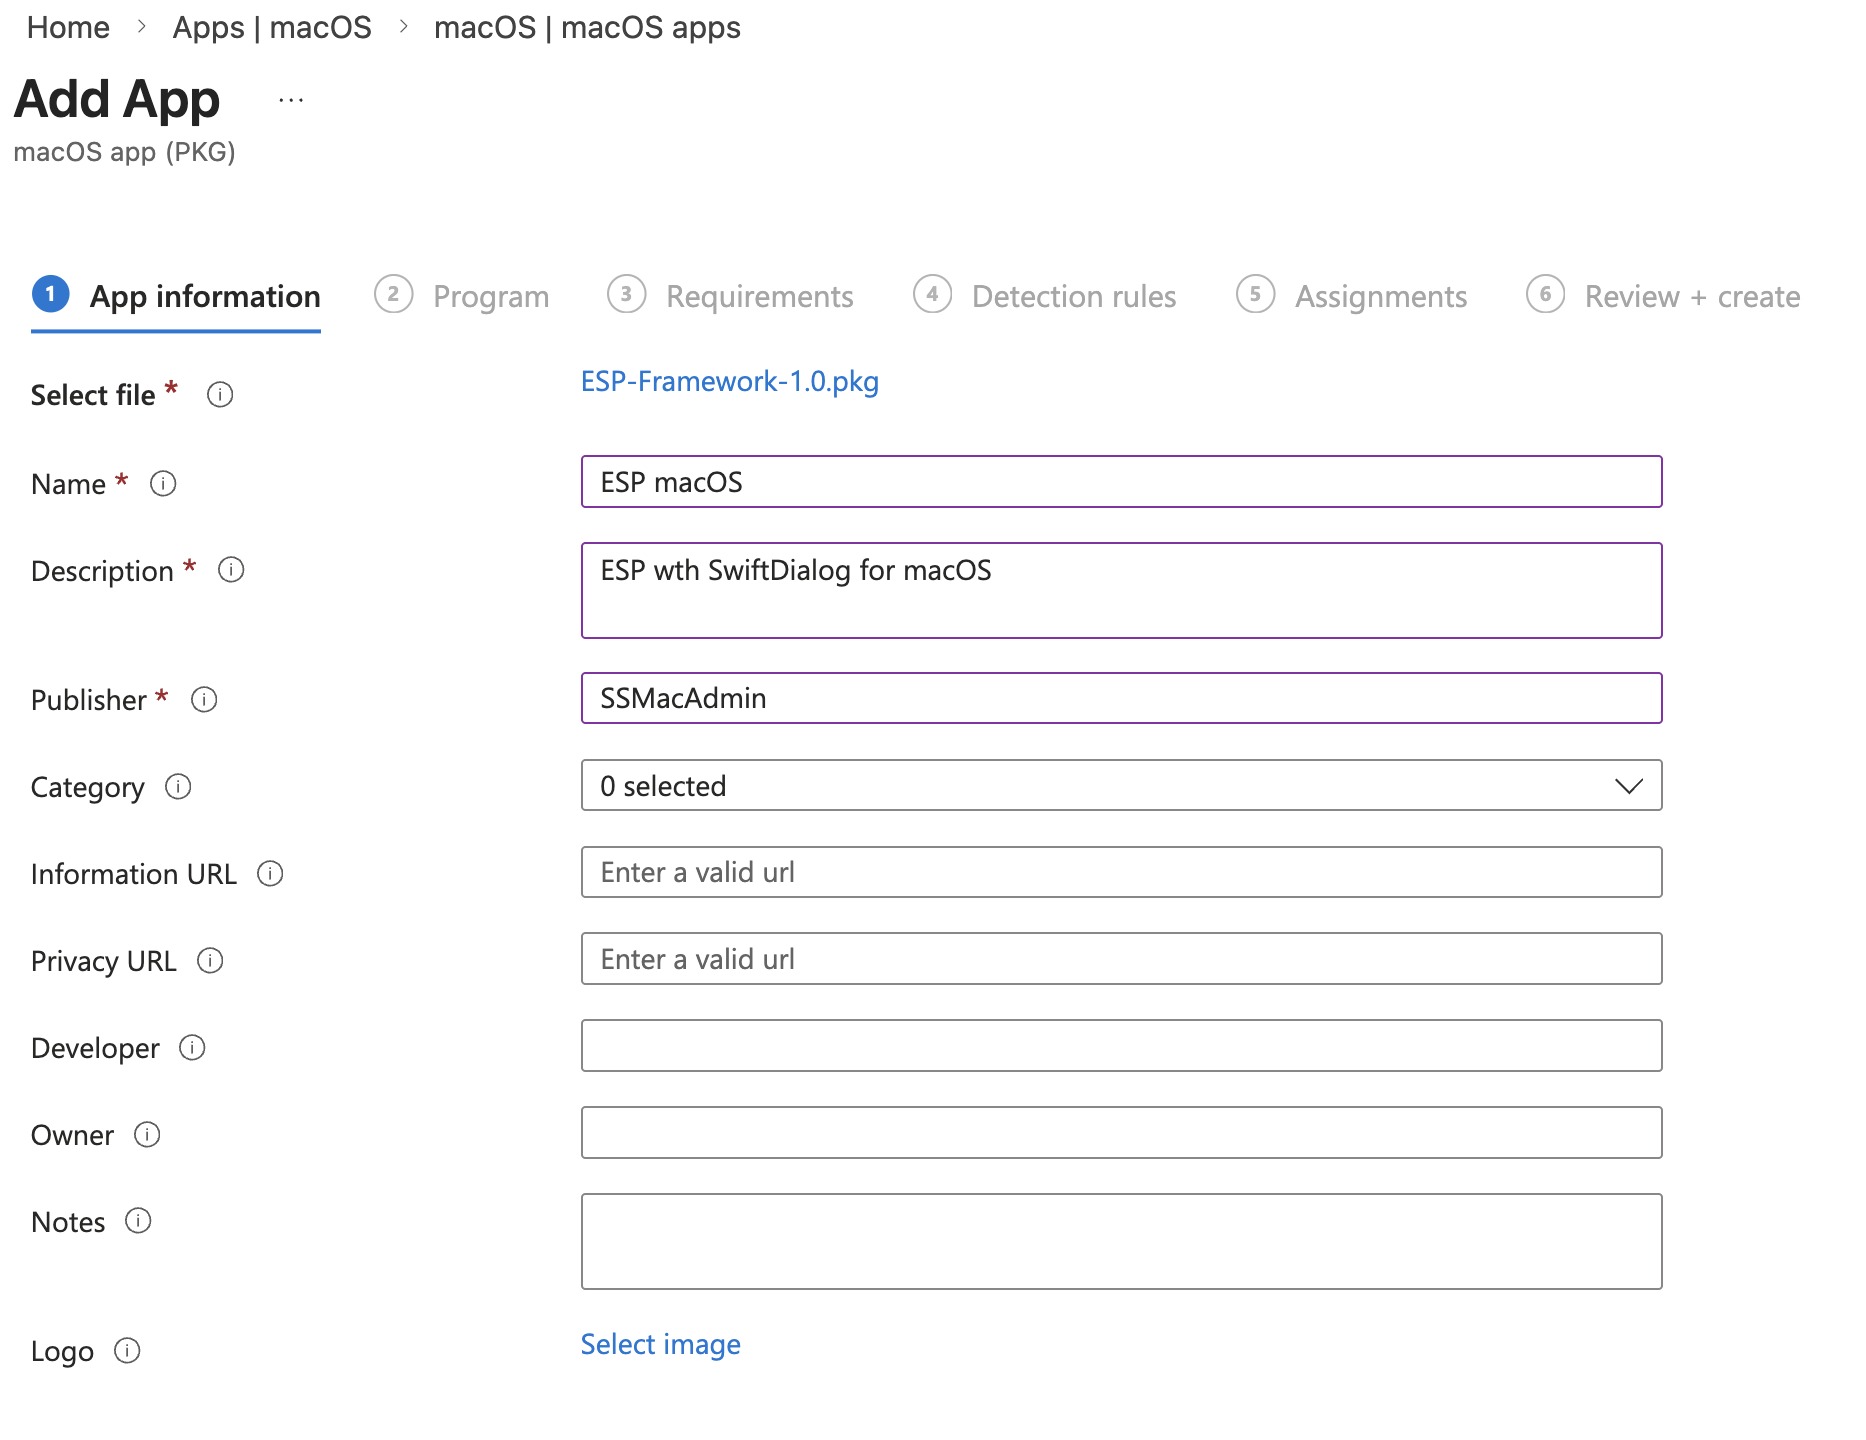
Detection rule: App bundle ID au.csiro.dialog, Ignore app version: Yes
Since macOS PKG detection in Intune only supports bundle IDs (no file path option like Windows), you need an actual .app bundle to detect against. SwiftDialog is the only app your PKG installs, so its bundle ID is the natural choice. Setting Ignore app version to Yes means you're not locked to a specific SwiftDialog release every time you update the PKG.
Assignment: Required, to a Device group you want to deploy to.
Save and create the application. You're now done! Yay!
What it looks like when running on a device: 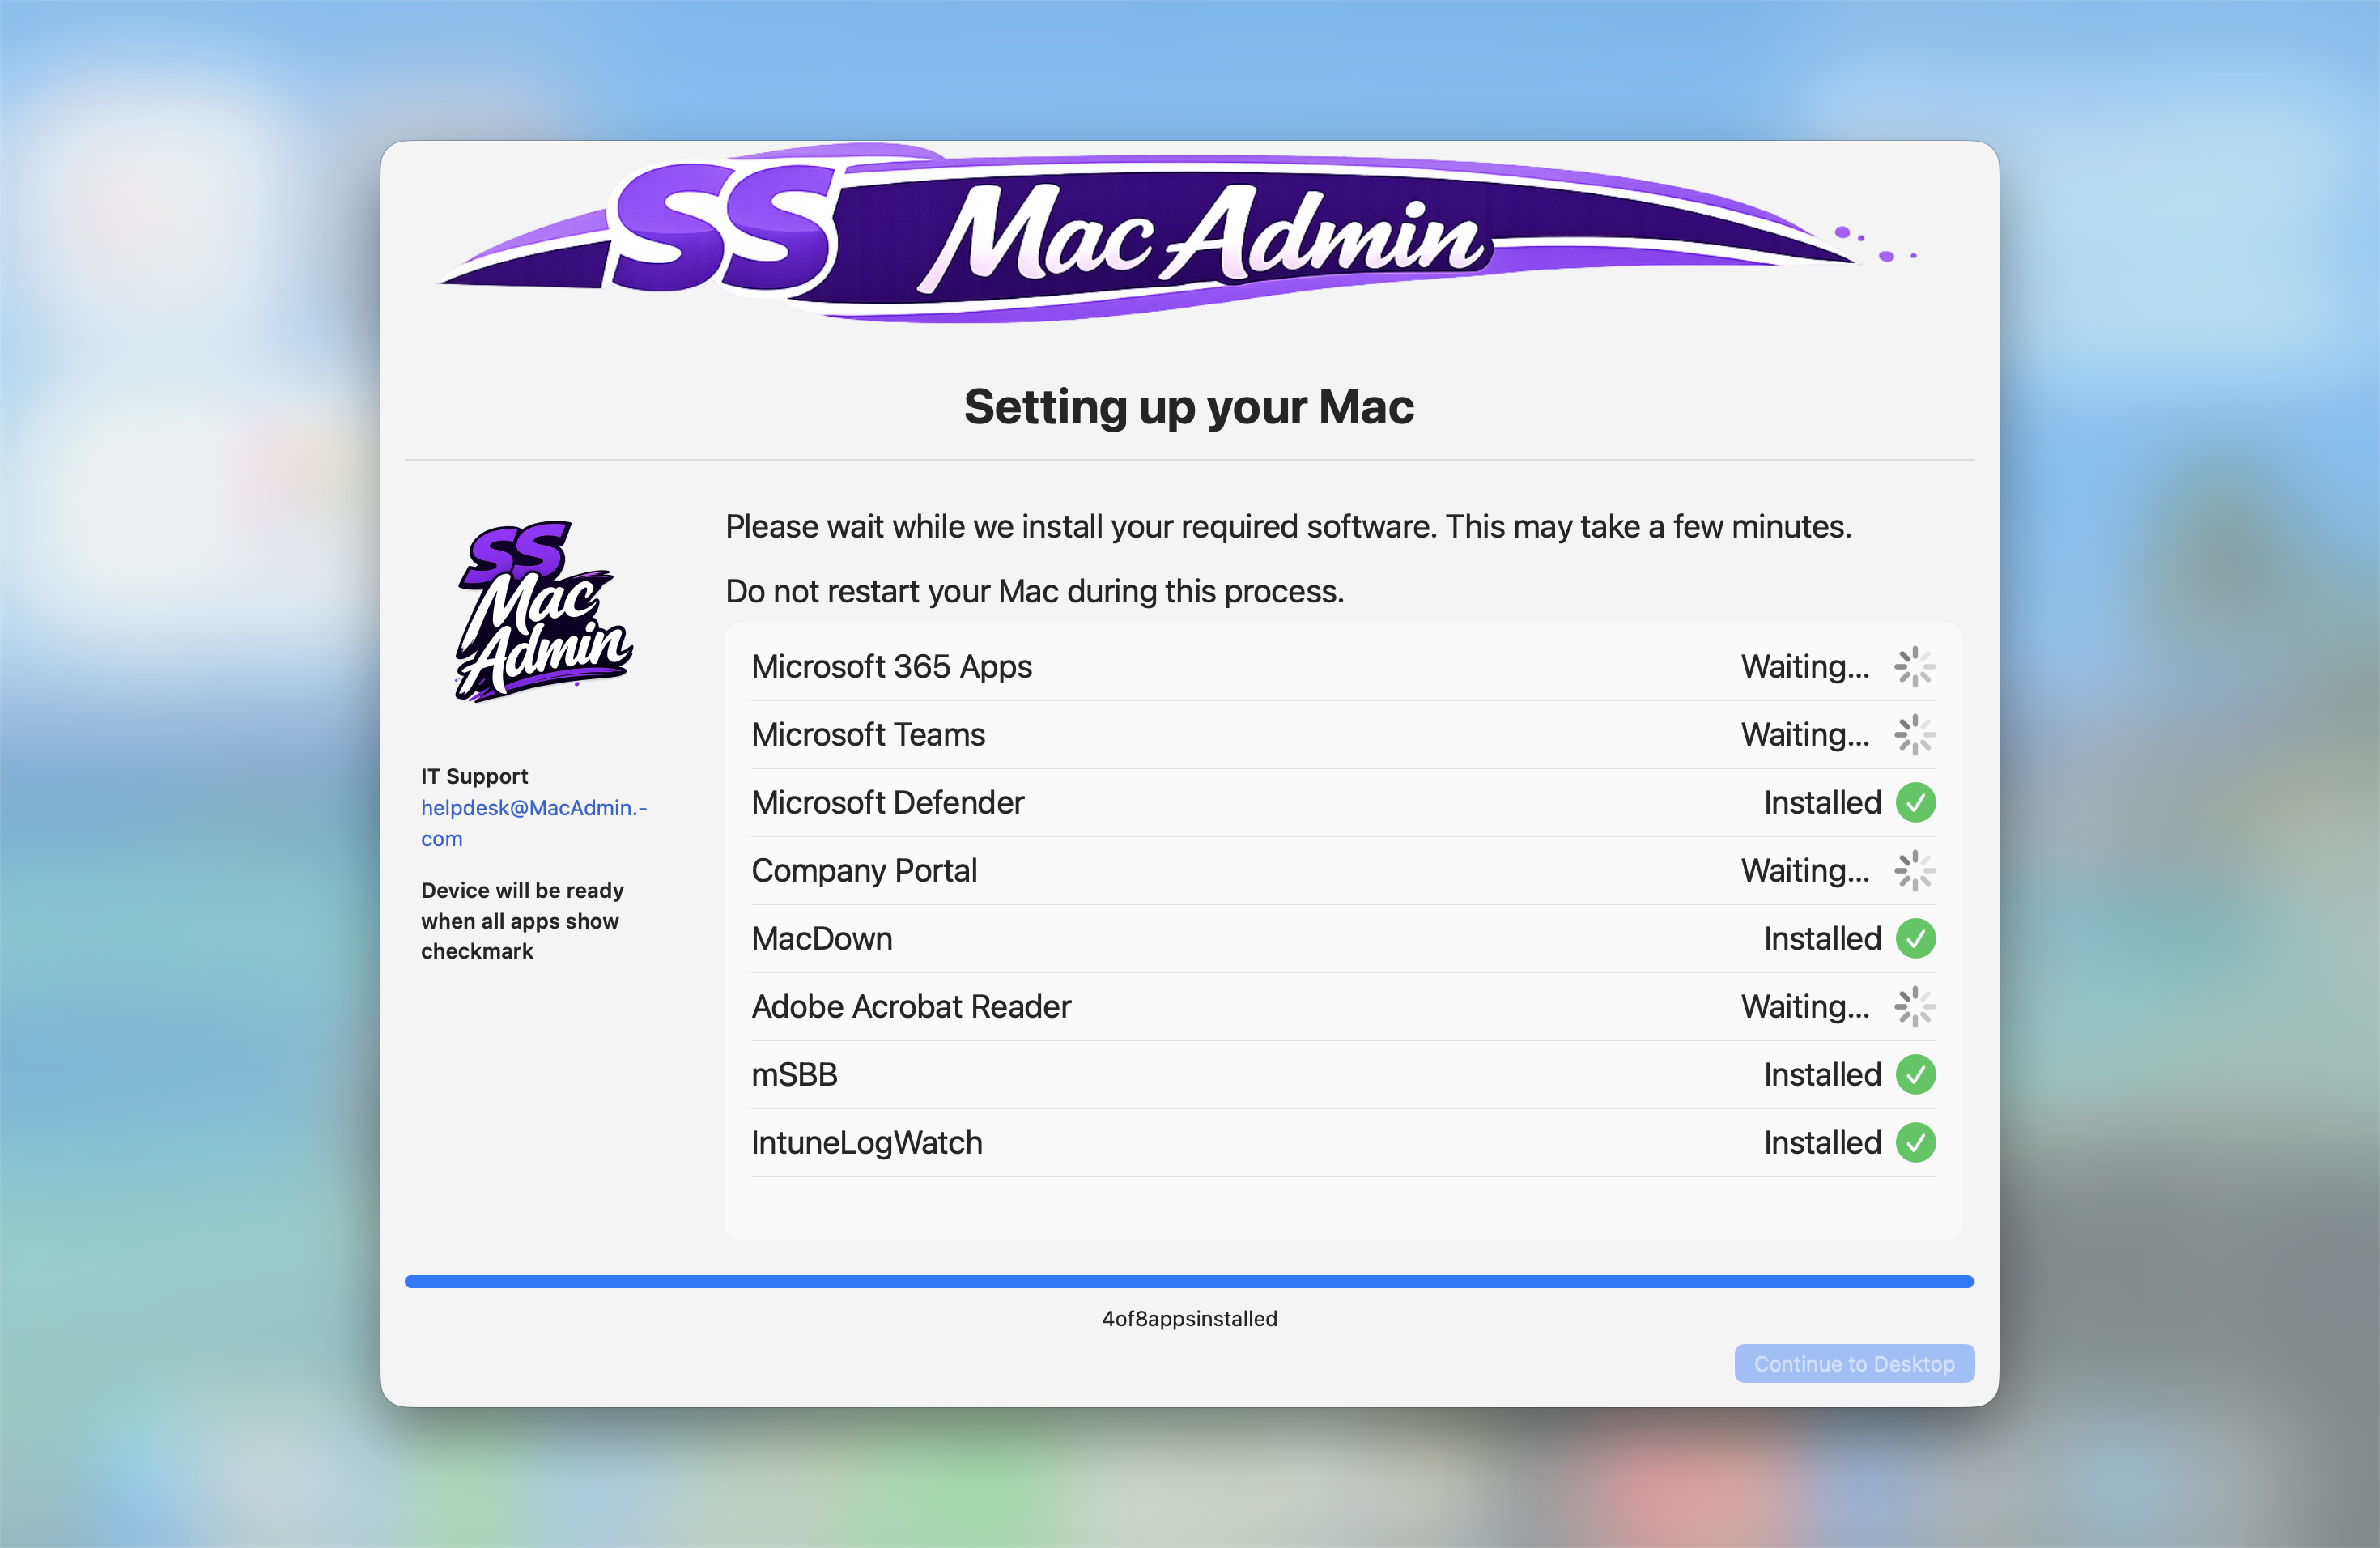
The daemon waits up to 120 seconds for IntuneMdmDaemon to appear before proceeding anyway — on a real ADE enrollment the agent typically starts within 30–60 seconds of the user session. The 30-minute overall timeout means even slow deployments get handled gracefully, with the Continue button enabling automatically if the wait exceeds the limit.
Cleanup
When the user clicks Continue to Desktop the agent doesn't just close SwiftDialog and exit. It:
- Archives the daemon log, agent log, and final state snapshot to
/Library/Logs/ESP/with a timestamp - Touches a
.cleanup_requestedmarker file - The daemon (running as root) picks up the marker on its next poll, removes both plists, wipes
/Library/ESP/, and unloads itself - The agent unloads itself last
- Logs are stored in
/Library/Logs/ESP
After a successful ESP run the only thing left on the device is the archived logs — useful for troubleshooting without cluttering the filesystem.
The Utility Script
Testing and maintenance are covered by esp-util.sh:
sudo bash esp-util.sh clean     # full teardown, ready for fresh install
sudo bash esp-util.sh unlock    # force-enable Continue button
sudo bash esp-util.sh status    # pretty-print current state
sudo bash esp-util.sh logs      # tail both logs live
sudo bash esp-util.sh restart   # bounce daemon and reload agent
The unlock command is particularly useful during testing — it bypasses the app detection and enables the button immediately so you can test the full flow without waiting for apps to install.
Get It
The full framework is available on GitHub. Download the zip-file, unwrap, drop in your SwiftDialog.pkg and optional branding assets, update TRACKED_APPS for your environment, and run ./build.sh. That's it.
ESP-SwiftDialog/
├── build.sh
├── esp-daemon.sh
├── esp-agent.sh
├── esp-util.sh
├── com.intune.esp.daemon.plist
├── com.intune.esp.agent.plist
├── postinstall
├── SwiftDialog.pkg      ← you provide this
├── logo.png             ← optional
└── banner.png           ← optional
If you deploy this in your environment I'd love to hear how it goes!